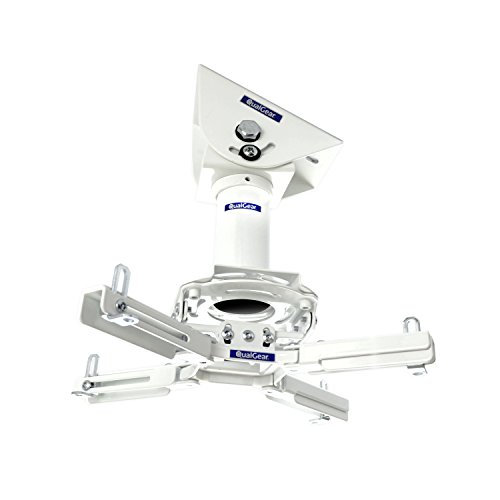
QualGear Pro-AV QG-KIT-CA-3IN-W Projector Mount Kit Accessory Single Joist Ceiling Adapter, 3" 1.5", White
Score By Feature
OveReview Final Score
Product Description
Questions & Answers
I was able to customize the legs to fit an Epson with three holes. With more mounting holes to choose from, your model appears to be a far better match. I don't think you'll have any issues.
A three-point mounting system is standard on most Epson projectors. This mount has four points. On two different Epson projectors, I've used this mount as well as another four-point mount. To accommodate the four point mounts on both, the mounting arms had to be rearranged. You can probably make it work if you're handy with tools, patient, have the time, and don't mind changing the mount. If not, spend the extra cash on a mount designed specifically for your Epson projector. Look through the reviews to see how I got it to work. I listed the steps I took to make it work even though it was a few months ago.
I've got the 5040 ub and it's great. br>There should be no issues for you.
It comes with a one-inch pipe. ml. 5" wide by 3" long. The 4010 is easily carried by this.
Selected User Reviews For QualGear Pro-AV QG-KIT-CA-3IN-W Projector Mount Kit Accessory Single Joist Ceiling Adapter, 3" 1.5", White
I attempted to install the defective product on our brand new 4K projector, but it was not compatible. The hex screws are made of cheap metal, and when we tried to install them on our projector, the tops sheered off. They can't take them apart any longer, the projector can't be mounted, and Amazon won't accept them back because they can't be separated. When I contacted QualGear, I was told that I wasn't eligible for support because I'm "not a pro installer and this is a professional product. " OK, so it's a professional product sold via Amazon FBA through Prime. Buyer beware, this company is terrible.

I'm glad I chose this product over a plethora of lower-cost alternatives. This product is extremely durable, and it took only an hour to set up thanks to the simple setup and clear instructions. The best part is that it includes a 4'' x 2'' plate that will easily fit a wooden joist beam (a significant advantage over a 4' x 4' base plate installation). It only takes two solid bolts to secure the plate in the joist, and a paper stencil was helpful in marking and installing the plate. The rest of the assembly was a breeze once the base plate was in place. br>br>The mount is very sturdy, made of good heavy metal that can support the weight of the project. The top tilt adjustments were simple to manipulate in order to get a straight projected image. The projector can be rotated 360 degrees after it has been installed. The cover over the base plate worked well to conceal hdmi and power cables; it isn't overly large, however, and there is enough space between the projector and the mount for cables to be hidden. Overall, it appears to be a very durable projector mount. br>br>.

The bolts are made of very soft metal and strip extremely easily. It looks nice and wasn't too difficult to install. Despite my best efforts, I was able to strip the bolt heads of their ability to move. It might be fine if you can get it set up properly and don't plan on taking your projector down or making any adjustments; however, the bolt heads were so soft that I was concerned about it safely holding an expensive projector.

If you don't want to go to the hardware store and buy a complete set of bolts to replace every bolt in the projector mount, don't buy it. The bolts are proprietary (as seen in the photo) and are very easy to remove. I'm not kidding, don't buy this unless you're willing to go down to the hardware store and replace every bolt. There's no reason they had to make proprietary machine screws other than the fact that if you lose your Allen wrench, you'll have to go to them to get a replacement.

It took some fiddling with the mounting arms to get it balanced properly, but once you get the hang of it, everything works out fine. br>br>One thing to watch out for is losing the hex keys that came with the mount, as they are "security" keys with a hole in the middle that lines up with a pin in the center of some of the mounting adjustment bolts. br>br>I mounted it a little differently than I've seen it done before, as I was hanging the projector in a bay behind the wall of the room I'm projecting into. I bought standard angle iron from a big box home improvement store (the kind that's typically used to hang roll-up doors). garage doors are raised; and attached the projector mount to it with bolts. Given the manufacturer's lack of options in other pipe lengths, I also purchased a very short 1" x 2" NPT pipe nipple to use as a short vertical rod. If you use regular NPT pipe, you won't be able to thread it in very deeply (I got it about 3/8-inch deep). On both ends, half). br>br>Anyway, this is a good solid mount with enough adjustment options that I was able to properly center the projector in the cutout in the wall. which necessitated a higher level of precision than I anticipated:.

To tighten them, you don't need to ream them down. They didn't cause us any issues at all. The screws appear to be made of aluminum alloy and will break if you try to wrench them down. Tighten with your fingers, then use the allen wrench that came with it to add a little extra. br>br>Aside from that, the rest of the mount is fantastic! It's incredibly durable! In about an hour (most of which was spent trying to locate a joist in the ceiling), it was up and running. br>br>Our Epson projector is a 3-inch projector, which is the only drawback we have. hole mount, and it was intended to be a four-hole mount. hole. It works with the three holes, but the spacing is a little tight. It's not the mount's fault; Epson was stingy with a fourth mounting hole.

Once installed, it will not move. Because the Epson 5030UB's mounting screws are so far apart, it was difficult to find a mount that would work with it, but this mount was so versatile that I had no trouble adjusting the arms to fit the large projector. The Mounting Bracket Cover, which conceals the bracket attached to our wood beam ceiling, is one of my favorites. The tube was just big enough for the power and HDMI cables to run through and be hidden. br>br>Adjustment options were also nice, with tilt forward and back, as well as side to side, and I purchased the optional pipes to make the drop from the ceiling almost 14 inches. For the height of my screen, this is the right height. br>br>It came with logo stickers on the pipe and bracket cover, but I was able to easily remove them, leaving the unit looking clean and modern. br>br>It's sturdy, and it comes with extra small screws to secure the drop pipe and prevent it from turning left or right. The design made it simple to attach the projector bracket to the pole. I was able to tighten all of the screws, so I won't have to worry about the projector moving in the future, which is important because I spent some time aligning the projector image to the edges of my 127" screen. It was a little more expensive than the other options, but I'm willing to pay a little more for functionality, compatibility, stability, and build quality. Everything I had hoped for was delivered.

Related Products For QualGear Pro-AV QG-KIT-CA-3IN-W Projector Mount Kit Accessory Single Joist Ceiling Adapter, 3" 1.5", White