GM Genuine Parts 23481275 Vapor Canister Vent Valve
Score By Feature
OveReview Final Score
Product Description
Questions & Answers
If I were the seller, I would contact him.
In order to purchase a 2007 Avalanche, I placed an order. There is a site on the site where you can look up whether it fits your vehicle.
When I installed the one I purchased, it was already fried, despite what they claim. My mechanic told me that I was lucky since it didn't short my ECU out. I bought completely useless garbage from my purchase and ended up spending more money than I had planned. It is better to bite the bullet and buy an
No, it does not come with an
Selected User Reviews For GM Genuine Parts 23481275 Vapor Canister Vent Valve
With more than 115K on it, the Yukon Denali is an '08 model. After the engine light first came on with a P0496 code, I had the dealer replace the purge valve on top of the engine. Later in the same month the light came back on with a small leak emissions code, so I replaced the gas cap and cleared it. I received a large leak code as soon as I tested for leaks with the evap monitor, as well as a P0449 vent valve malfunction code, as soon as it returned to "ready" status. Based on a couple of YouTube videos, I realized I could handle the assignment. The creeper was purchased for a low cost, this updated part and its wiring harness adapter were ordered, installed, and the error code was cleared. For the evap monitor to return to "ready" status and be tested, it took about 3 weeks of continuous driving. The last time I checked it was one week ago, and I have checked several times using my code reader, and there are still no pending or fault codes, so I will raise the alarm! To ensure a smooth ordering and installation experience, here are a few tips I. - You should also order the ACDelco 19257603 jumper wiring harness, as many have suggested. It will be of great assistance to you. It's - Get rid of the spare tire and move it off the road to provide more space. Five foot ten and one hundred fifty pounds is how tall I am. Fortunately, we did not need to jack up the vehicle however, we did need to move the spare. I. - Make sure you use a creeper so you can maneuver in awkward positions to connect/disconnect I. - Put on safety goggles, cotton or plugs in your ears and a cheap particle respirator (lots of fleas will be flying). I. - You can watch YouTube videos on how to pinch the hose to let go of the charcoal canister if you search. As soon as you know how, it's not hard. I. - Invest in a code reader to keep tabs on/clear codes if you don't already have one. You can keep this in the glove compartment of your car for less than $20. It's - As soon as the evap monitor is installed, it tests for leaks. It can only do so after it meets a series of conditions (i. e. There are a lot of factors involved, such as vehicle in cold mode, temperature in the ambient area, and more). An instrument that reads and scans code is one tool that can be used for monitoring. Once installation is complete, if you have not cleared the error code, the light will remain on until all tests are passed and no vapor leaks/system malfunctions have been found. Once you have cleared codes, you are not in the "clear" until the evap system has been tested and there are zero codes. It took me three weeks of driving in Wisconsin to accomplish this. It means that another part of the system (purge valve, gas cap, charcoal canister, wiring, etc. ) needs to be addressed if there is still a leak after the new part has been correctly installed. It is a lengthy review, but I hope it will help you! Good luck & sorry for the length! The price on Amazon is excellent for a DIYer looking for OEM parts!.

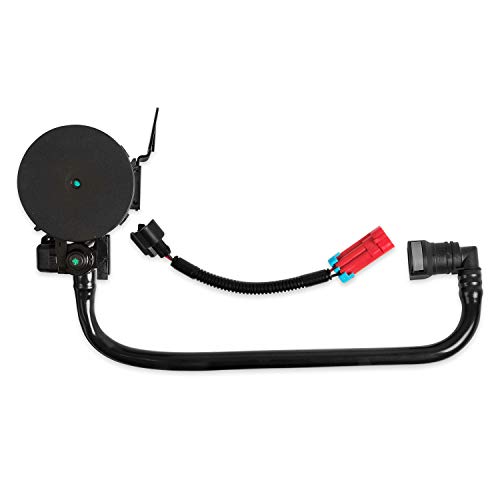
The fit was perfect and I was able to solve my P0449 error code. A P0449 code has been issued to me on a 2009 Chevy Tahoe. The ACDelco 19257603 plug adapter and this are the products I bought. I changed this in about an hour and it was very easy. After 30 minutes of trying to remove the stupid spare tire, it finally came I had to use a long screw driver to release the safety lock because it was stuck. All new hoses and a new steel bracket are included in this canister. Due to the new electrical plug as found on this canister, I absolutely had to get the ACDELCO 19257603 Adapter. The canister in this file is a recent update. It has a slightly different shape than the original factory ones. Rather than route the stiff hose so that it is above the charcoal box and then downward, I had it run under the box and then up. In this case, there was no problem It is not a major issue, but wanted to make it known. I found that the flexible breather hose fit well and that zip ties were provided to secure Note also that this won't fit with the old With the canister, a bracket is included with which I had to work to get the canister to sit correctly. As a result of the old bracket, the canister was installed improperly, contributing to the pinch of the stiff pipe. With the new bracket, all pipes fit exactly as they should -- no problems! You will need to remove the single bolt holding it in place with a 13mm wrench. In general, this was a very easy change to make, and my only tools were a 13mm wrench, a flat screw driver, wire cutters to cut the old zip ties, and a $10 code reader to reset the security.

Just keep in mind that the vent hose from the canister to this solenoid is expected to be routed differently than the one you're removing You will kink the hose if you try to route it the same way as the old one. Rather than routing from the vent solenoid to the canister outlet, this one requires you to route beneath the canister. In the old model, the hose was routed above I like that the zip ties are already attached to the outlet hose so I don't have to attach them myself. It was very easy to put on thanks to that. Yes, you will need the electrical adapter, which is sold separately for between $17 and $20.

I was able to resolve the issue with CEL. There is no way that this is as hard as it appears. I had a check engine light on my 2009 GMC Yukon XL Denali, and the code indicated that the vapor pump was bad. In theory, since the part is relatively affordable, and because it includes all of the hoses, I should be able to replace it. It was a little difficult to install the rear undercarriage of a car with 175k miles on it since it is dirty. It's essential to have safety courses if you're doing this kind of work. Also, a way to take a selfie with your wife once you've finished, so that she thinks you worked hard. When you detach the hose from the canister, keep an eye on where you are. While I struggled with the incorrect hose for some time, the correct hose came off with no trouble. You can find a good video tutorial on youtube. During the How to Automotive segment, I watched Brian Eslick His 2007 one is great, despite the fact that it is for a 2008. You can cut the zip ties coming with it, but DO NOT cut them. Two of them have a double bed In order to connect the vapor inlet tube to the filler neck, these parts can be used on the head. In my old hose that runs up next to the filler neck, I found damage to it. There are probably all kinds of dirt sucked in through that vapor pump, and that killed A protective cover is on the tube in this new design, so that shouldn't continue to be a concern. My entire process took about an hour, before I even had to deal with the wrong tube on the vapor canister and after I removed the spare tire. There is nothing harder for a DIY-er than to do this in the driveway after work and before dark. Watch the video first, and make it sound like your SO will appreciate it more if you hype it up to them that it will be really hard. It was as if the CEL light went out of the blue.

Related Products For GM Genuine Parts 23481275 Vapor Canister Vent Valve