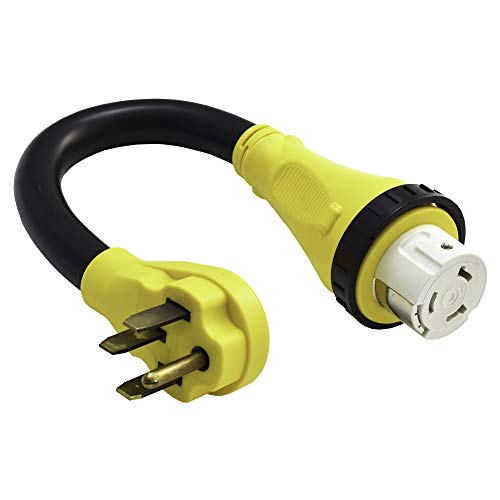
ParkPower by Marinco 30ARVKIT 30 Amp, 125V RV Conversion Kit
Score By Feature
OveReview Final Score
Product Description
Questions & Answers
An electrical connection kit needed to connect the motor to your coach is sealed to prevent bugs and rodents from getting in. Make sure you have the appropriate kit for your coach, with either 30 or 50 amps. The main panel and the connections to it on an existing coach can't be switched to 50 amps without changing out the wires leading to that main The appropriate adapter can convert either a 30 amp or a 50 amp system to 15 amp. It is my personal preference to use Marinco equipment because it is exceptionally high quality.
That should be fine, but make sure you have tight connections. You may not be able to use a solid wire plug with the black lock ring attached if you are talking about solid wire. A multi-faceted approach is also essential Wire strands are designed to be flexible so that they can be plugged and unplugged again and again. Solid wires will break if they are folded repeatedly, but flexible wire is flexible. This would not be an issue if you are parked permanently on a site. It should be replaced with a multi-purpose apparatus if it isn't There are two strands in a
The company tells me that this year (2019) they are selling a black version. Throughout this document, part number 30ARVKIT will be used. The color black.
If you want the black inlet you will need to purchase it separately, as it is not included in the full kit. Marinco part number 301ELRV is available in two black versions, one square, the other round. The part number for round one is 304ELBRV and the part number for black is BLK. The color black. There is an Amazon listing for the square one with the ASIN
Selected User Reviews For ParkPower by Marinco 30ARVKIT 30 Amp, 125V RV Conversion Kit
The QB18 is the only version. It comes with a plug end that you attach on the end of the existing power cord that you cut off. You don't need to buy an extra cable for it like I did. It made sense for me to keep the extra cable I purchased in case something happened to our cable and that way we would have a second one It does not take long. A piece of Butyl seal tape will need to be ordered. The product I used was From 1834 to The Butyl Seal Tape I used was 1 1/8" x 3/4" x 30', and it worked perfectly! The outlet I was installing did not come in black, so I strayed painted it before installing it.

The two of them were unable to mate, regardless of what I did. I went to Home Depot to buy some 30A male and female plugs Replace the female end with a female replacement to serve as a comparison and It was immediately obvious that there was a problem. As you can see, the two curved slots on the Park Power plug are reversed in my first picture. There is a shorter slot at the top than the one at the left. As seen in the second picture, one can clearly see the correct size slots in the store-bought item. Simple steps were taken to fix the problem. The slot was widened by using a Dremel tool. Image 3 shows the situation. There was about a mm or so of material I had to remove Having the cable in the correct place is now easy. I am very happy with the way this solves the problem of stuffing the cable back in, which was an irritation It would still be a good product if I did not have this problem.

It appeared the included instructions were for a totally different product, but it was relatively straightforward and easy to assemble. For my particular trailer, the mounting plate needed a bit of adjustment, but it wasn't too difficult. There probably would not be a need for most of them As long as the Mouse Hole is closed, I am free to keep my cables coiled and happy for years to come.

There were no screws in the kit as specified in the instructions. With this kit, I was able to convert the old style power inlet on my 5th wheel to this modern Upon receiving the Kit, it was in good shape. The instructions were in the box, which I opened and read. In their instructions, they said to use the enclosed 8-inch paper To attach the housing to the plate, 32 screws of stainless steel are needed. IMPORTANT DO NOT USE SCREWS. contacted the factory and they told me that the kit does not have The frustration of having to go and get screws was experienced by me. Also included in the kit was a gasket that was not mentioned on the factory's part as not being There is some confusion with thin gray rubber (Thin Gray Rubber). It is a good kit that was well constructed and does the job well. Despite a couple of frustrations and confusion, it would have received a 5 star review. Even though the price is high, it is cheaper than trying to make the mounting plate and gasket from scratch. I have an update for you 6 My shop purchased an extra Right Angle cable by Park Power/Marinco in order to relieve the straight connector that came with the kit of any stress. straight connector in the kit does not have a locking ring that fits the straight connector on the right In this case, only the connector will engage, not the locking ring. A resolution will be obtained by calling Park Power. We will provide more updates in the near future.

Patching an extension cord. Changing a fixture from time to time. Having purchased our 2019 Casita trailer LD and wanting to avoid the long RV power cord taking up even more of that nonexistent storage, we thought we could replace it with an extension cord. The tube and I did the research, after which I made my decision. In this case, the installation was a new one. I'll be honest, the instructions are not the best. They tried with pictures and all that, but it's hard to follow. Therefore, I suggest using the guides more as a reference than as a guide. Watch a few videos on Youtube to get you through. You might be able to do that if I did.

It may be a great product, but the instructions are absolutely awful. Black and tiny, they look like they are When I searched the Marinco website for clarification, I could not find the product, let alone explicit In the end, I managed to get all the right pieces onto the cable in the right order, and the rear safety enclosure lined up so that the tabs would mate with the inlet after connecting and disconnecting the wires twice. It is said that one picture is worth a thousand I believe that the installation process could be clarified dramatically It was marketed as three different products with fewer parts in each, which also reduced the price of each product.
a) There were more detailed instructions, including large color photographs or even an assembly video b) the item was less expensive. It would be particularly helpful if there was an arrow pointing toward the rear safety enclosure. As I squatted and lean over in 95- I installed my mouse hole replacement It was not fun to spend the day in the 100-degree sun. Furthermore, I wonder why Amazon charges $74 for this 30A product. We will offer the 50A version 3 items for $168, followed by 98). Approximately 30%), more than twice. Is that true?.

Previously, I had to pull the electrical cord from the bottom of the RV's storage compartment to reach my 30 amp outlet. There was an outlet port under the RV that I had to fish through all the time, and I got tired of doing it. Plugging in my cord is as easy as taking it out and plugging it in with the conversion kit. Simple as that. A power transfer switch was installed during the same installation in order to control shore power, generator power, and solar power in the future. Having taken measurements and decided where all the components would be in the final product, I began to construct the structure. The main concern I had was how to get the current main power cord out to the side of the RV from the Surge Protector (which I installed a few years ago). The RV came with an older exterior and I did not want it exposed to the road elements of dirt, water, and especially road debris that could snag it. It works great, looks great, and gives the RV a nice new.

Related Products For ParkPower by Marinco 30ARVKIT 30 Amp, 125V RV Conversion Kit