


2-Pack FORITO 15.6 Inch Laptop Anti Glare(Matte) Screen Protector Cover for All 15.6 inch 16:9 Aspect Ratio Screen Laptop, Scratch Proof, Dust-Proof and Fingerprint Resistant
Score By Feature
OveReview Final Score
Product Description
Questions & Answers
I say yes! While the bright light of the outdoors is a concern when I work out on my deck, the weather was very nice when I was doing it. Now that the Forito Screen Protector is available, you no longer have to be concerned.
I would say yes to that. The material has a matte finish and is anti-glare, which is great for pens and tablet computing.
The matte version of the laptop works perfectly with an Asus touch screen laptop and without reducing the sensitivity of the touch screen
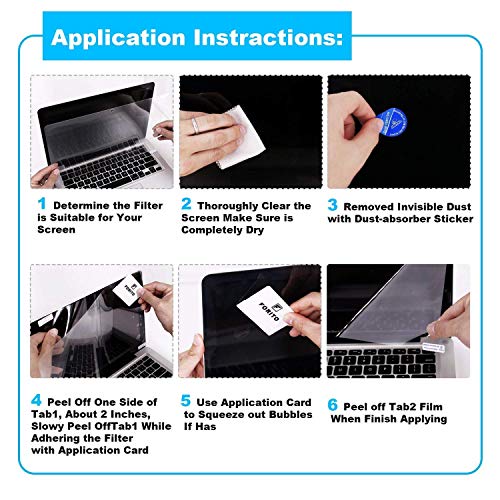
An easy method of removing the film is to lift it up and remove it. When installing, it is important to take care. If bubbles appear under the surface after it has been installed, it can be lifted and re-installed We've installed it.
Selected User Reviews For 2-Pack FORITO 15.6 Inch Laptop Anti Glare(Matte) Screen Protector Cover for All 15.6 inch 16:9 Aspect Ratio Screen Laptop, Scratch Proof, Dust-Proof and Fingerprint Resistant
I needed exactly what you said. My screen is directly in front of a window. There was no daylight in this room. I kept having to pull the blinds to see anything! The same is not true here. Here is a list of what A credit card or some other hard surface edge, such as a credit card, a screen with no dirt. This is how you put it on perfectly, I've got a tip for you. Then turn your bright up to the The second point is 2. Place an office file or blank white screen in front of you. The fourth point is 4) Continue slowly peeling once the top has been anchored to the screen, using an edge of a credit card to control the drips as you go. Smooth down and across as you go, and keep taking steps as you slowly peel. It is not a good idea to Usually, it doesn't take more than ten minutes, but it is worth the wait! If the bubbles aren't smoothed out as you peel and press with the edge of a credit card, you can peel it off. The first one I attempted didn't go so well because I removed the whole thing then tried to peel it off. It's not happening. Similarly to tablets and phones, you have to press, peel, and scrape as you go or else you won't get a smooth bubble-free By using bright white light and a white screen, you can easily see the bubbles as you place them. Make sure your screen is free of dust, lint, and dirt before you begin, and be careful not to be too fast! You will be happier if you go slower since you will be able to clear all of the bubbles.

But, there is zero overlap on the bezel past the LCD image area of a 15" computer (no overlap). I put these on two Dell laptops and both worked It is anti- Using "Glare" for glare control doesn't eliminate it completely, but it creates a smooth and obvious "hot spot" of light instead of a difficult to see reflection You will see a detailed, sharp, mirror image Whatever you are facing will be reflected back at The flat-frame design is similar to that of a traditional flat-frame Before high-def everything, there was a flat-screen monitor It has a glossy finish and a tactile feel Several glass bottles. In my photos, you can see the overhead lights still cause a "bright spot," but where the screen protector covers it, there is no sharp reflection like the edges of the display and it does not have a mirror effect. The fan and the light reflect each other In opposition to It would be better to describe this as reflective than anti While it may be a little disconcerting from a distance, it does exactly what I require. In this case, I applied it to the following two machines The Dell Precision 3510 is a desktop computer. As the fifteenth grader, you are 15 years old. I could just about fit a 6" laptop in it. Since the screen protector is precisely the same size as my battery, I had a lot of trouble putting it on In the – Even the smallest error is displayed on the screen at the size of the pixel they should make it about 1/4 inch bigger in each direction so those who are trying to get it right have a bit of a margin of It worked well in the end, and the touch screen issue I had at work was resolved and I could use it again Adding to the distraction is a screen that reflects light coming through a There are now no blinds on the walls behind my cubicle and I can better view my screen. The Dell Inspiron 13 7000 is the highest-end model in the company. As it was designed for a 13" computer, I had to cut it a bit to make it fit, but the height was short enough for me to fit it under the webcam without any issues. Next I'd like to provide a few notes on how to use As with any other screen protector, you have to get the glass perfectly clean before applying it and you only get one chance. To apply it without bubbles, simply follow the same steps as any other screen protector. Make sure you test-fit the protector on the monitor before removing the backing so that you know how much space you'll need to cut down if necessary. The last thing I do is use rubbing alcohol and/or distilled water on a paper towel to remove grease, oil, smudges, and dirt, then canned air to remove dust. This must also be done in a minimal dust environment (and with minimal air flow). Any movement, whether it's pets, fans, other people, or anything else, will stir up dust and make it harder to apply without creating To do it, I chose to use a spare bedroom that is currently used as an office or storage. I placed the desk on the side of the bedroom where the air is cool It is a vent for air conditioning. I set my bigger computer to have a full-size monitor for an optimal viewing experience To align the bottom edge of the protector, I was able to see the edge of the LCD screen by filling it with a blank image. Removing the screen protector from your smartphone, pull it back a couple inches from the bottom edge, but do not touch the adhesive backing. Cover each edge with a piece of glass if you have overlap) and let it adhere for half an Make sure you go smoothly. If you have bubbles, stop immediately and carefully lift to remove them and then run your finger tightly back over them Fill in the bubble where it Ensure that the bottom edge of the tape is smooth and free of bubbles. Begin working the backing off a tiny bit at a time as you guide the screen protector onto it, repeating the process as needed. The backing should always be applied slowly to avoid trapping air and forming bubbles, and stop immediately if any bubbles develop. When you reach the last 2 inches of the display, begin working the backing off diagonally so the final corner will be the one you need to apply. At the end, peel off the last portion of the backing while gently smoothing it on the last corner in a smooth motion, hoping there will not be any bubbles. happen to have a bubble in a corner, you can try to "rub" it to the edge, but you should not remove the protector as it will damage the adhesive and make it worse than it already was. Last but not least, remove the clear secondary film that is placed on the front of your screen protector.

The glare was a huge distraction and made it very hard to work. This incredible product saved the day and enriched my life greatly. In order to get a bubble-free screen, installation is 100% dependent on your patience. The environment for installation must be free of dust. It took me a while to figure out that the first screen protector was going to be sacrificed because I was impatient and did not pay attention to tiny dust particles and there were tens of bubbles due to those dust particles The first time I tried the screen, I had a badly cleaned screen. I cleaned it thoroughly and I installed it slowly. After doing these two things, I had a screen that was almost perfect with just a few tiny bubbles. While the screen is on, it is certain that you will not see your reflection. It will be a definite buy for my future laptops if I need this product in the future. I would appreciate it if you voted for this review if you found it helpful.

Related Products For 2-Pack FORITO 15.6 Inch Laptop Anti Glare(Matte) Screen Protector Cover for All 15.6 inch 16:9 Aspect Ratio Screen Laptop, Scratch Proof, Dust-Proof and Fingerprint Resistant


![[2 Pack] Anti Glare(Matte) Screen Protector Compatible with MacBook Pro 13 inch 2016-2020 Released Model A2289 A2251 A2159 A1706 A1708 A1989, with Anti Dust and Finger-Print Coating](https://cdn.overeview.io/6095900_1631477552214_0.png)