Mount-n-Lock GennyGo RevX2 RV Bumper-Mounted Cargo Box and Tray Supports (Steel)
Score By Feature
OveReview Final Score
Product Description
Questions & Answers
I have updated There is no shipping charge now!
There were no red flags on it I put reflective tape on it instead. Having lived in Canada for over a decade, I have been back and forth at least three My 2000 watt Champion generator and fuel can work great with this.
I can see the potential, but I wouldn't use them as such since the material at the ends would be too The bumper supports on my rig are four square attachments that are much thicker and heavier than the round ones.
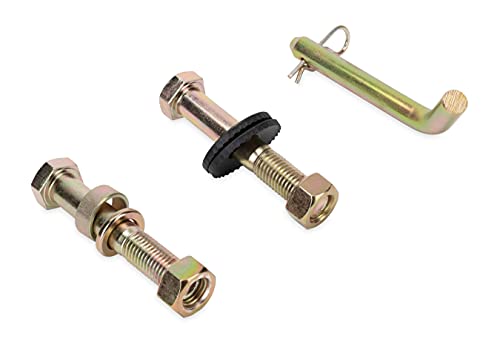
Mounted on an RV bumper, these brackets enable the vehicle to move. Looking at the picture, it is easy to see that the bracket is square at the back. Basically, the bracket is designed to fit over the bumper of the RV (assuming it has a standard bumper). At the very back, there is a bolt that is inserted into the bracket to secure it A lightweight plastic cargo box was mounted on the back bumper of my trailer to carry all of my black/grey tank drains accessories, so that I would not have to store them in the basement. This is commonly referred to as my "poop box." I really like how it turned out. drilled holes in the bottom of the box to use bolts to attach it to the brackets, so I could mount it to them with small screws. I'm pretty sure you can do it. A drill and a few small bolts from Home Depot are all that is needed. Getting the box overloaded would be a bad idea. According to my understanding, the brackets have a maximum load of 200 pounds. However, I wouldn't put that much pressure on it to test it that much with two Rather than a single set of brackets, I would recommend buying 2 sets if you are going to fill the box with heavy items. Furthermore, I would make sure my bumper is capable of supporting the added
Selected User Reviews For Mount-n-Lock GennyGo RevX2 RV Bumper-Mounted Cargo Box and Tray Supports (Steel)
Bubble wrap and a good packaging were used to package the GennyGo. This black coating is scratch-resistant and is coated with a black layer. Assembling it and bolting it to the travel trailer bumper for the first time took less than 30 minutes. As I stood on it (weighing 200 pounds), it did not flex at all. Even though the package states a maximum load of 200 foot pounds, it seems like it could hold more than that. I found all the hardware to be of It is very effective. There are three different ways to mount it so you are most likely to find one that fits. Great product and very easy to install We purchased the GennyGo for our high performance predator 3500 genset (100lbs). To carry it to the height of the pickup truck bed is a challenge, but the GennyGo is so much lower that it is much easier to load. This product is amazing - I can't recommend it enough.

It would be fine for just a carry-on by themselves as they are strong and simple to install Whatever you want or whatever you want to light up This is a duty use, but I had to mount a 200 lb. truck. I have a (DRY WEIGHT), 5,000 Watt generator on my bumper, and these guys can't even handle that by themselves. You can also purchase an additional bracket support package (for nearly the same price as the arms themselves), but these only bolster the upper arms at the front bumper only. As a result, I did not fall for it. It's the mounting of the arms when they are mounted at the appropriate spacing that causes problems. Out at the end, where they have a lot of play left and right, no one has ever thought of mounting their $800 generator to What I did was as follows. purchased three 90 degree steel angle arms for a total of $15 and a pressure-sensitive light bulb As of now, there has been a significant reduction in the amount of play at the end of the arms, but it has not been eliminated entirely. Use the three notched face of the washer to tip more of the weight back onto the bumper if you are installing the square washers with the notched angle adjustment. Ignore the instructions that tell you to put them on with one notch facing the In addition, I put the generator right up onto the arms and bumper as far as it would go, which left over 3 inches for the end of the arm to stick out. The 2"x4" board was cut into two 24" lengths. I hammered one all the way out in the angle iron and hammered the other one in behind it against the generator frame and then secured the boards with 1 1/2" screws all the way down the angle iron. In the end, you have a solid installation There is no movement whatsoever in the panel. If I am pulling my 5th wheel, I will attach 1, or perhaps 2 heavy-duty chains The duty ratcheting tie is a It's best to take a few downs just to be safe, but the thig is unlikely to leave. It is not only unnecessary to reinforce the bumper itself with the additional kit, it is also expensive since your bumper is just a steel tube, 4"x4" in size, welded to an I-beam. All of the beams on the coach run along its length. Profit is the only goal, but what else is there? There is nothing. Please look at the photographs and don't forget to follow the 3-step process The notch should be four, not one.

A generator or other cargo can easily be transported in this bag. The design is well engineered, and the assembly and installation are easy. It's a beautiful design and the craftsmanship is superb. It's a lot stronger than it appears to be. After finishing my workout, I sat my 190 pound backside on the end and it did not exhibit any much better than what you'd find in a welding shop. My 3500 watt inverter generator is the perfect size for this and it has a weather cover so it won't stop working if it rains.

To mount a generator box with a generator on the back of my travel trailer, I have purchased two sets of (4). When I stuff a propane tank and a full gas can inside the box and generator, they weigh just under 250 pounds. The previous time I was back there I had a receiver hitch and a cargo carrier. Two problems presented themselves it was too low on the ground and the whole setup moved in a way that I was not able to control. It is much more effective this way. Having now raised the box 6 inches from the ground, it is rock solid, unchanged since it was installed. It will work fine if you add a thin bumper, just reinforce the frame where the bumper meets the body. You can purchase the bolt on brackets from Amazon as well, but the part number is not shown. Just look under RV bumper reinforcement for the part number. My next step will be to take some pictures and post them.

This is one of my favorites! This set was part of my purchase of bumper struts along with the bumper area storage. You can install them in just a few minutes. Due to my small size, I was able to do this on my own with little effort. As well as installing the boxes to the storage boxes, I bought storage boxes. I now have tons of extra storage in my new travel trailer because of this. It is a product I would highly recommend.

IX) and the Mount- X RV bumpers are prevented from failing by locking SafetyStruts. My time required about 20 minutes for all three to be mounted together. To mount it directly to the support arms, I drilled through the bottom of the chest and used bolts/nuts. After purchasing the trailer, I drove 400 miles the following weekend almost entirely interstate, without a problem. I appreciate having a more accessible space for all my hoses and leveling blocks, which freed up space in my pass through.

You probably know that owners of RV travel trailers will only be able to attach a sewer hose on the bumper. Additionally, the bumper will not accommodate any black tank hookups to run the I bought these brackets, as storing black water tank hookups and extra hoses in my basement was a problem I could not solve. I installed a lightweight but durable "poop box" on the rear bumper of my trailer to resolve the problem. The brackets are easy to install, are very durable, and can be mounted on any bumper with a 4 inch diameter. The items I had been keeping in my trailer basement have no longer to worry about being contaminated. Currently, I store them on my trailer's back in my "poop box. " There is an additional foot to a foot and a half to the back of the trailer since brackets and box are added. When mounting a bumper mounted spare tire, the brackets do not extend much further than the spare tire itself. I had to slide my spare to one side to allow for the brackets and box to attach to the other side. It was fairly simple If you need to mount a box to a bumper, these are the high-quality items I recommend.

It was easy to assemble and mount the mounts. Despite its rough finish and packaging, the hardware is well packaged. The directions are clear and easy to follow.
Related Products For Mount-n-Lock GennyGo RevX2 RV Bumper-Mounted Cargo Box and Tray Supports (Steel)